Adjustment layers are to help you with editing and they allow you to re-edit image adjustments you’ve made and allow you to keep the original image from changes.
keep a layer above an adjustment layer as it affects all layers beneath it.
add an adjustment layer by clicking the circle icon at the bottom of the layers tab
![]()
or you can select the layer to which you want to apply the adjustment layer. Choose Layer > New Adjustment Layer, and choose an adjustment type.
When the hue and saturation tab is open, using the menu allows you to select a specific colour that you can adjust the hue saturation and lightness for just that colour.
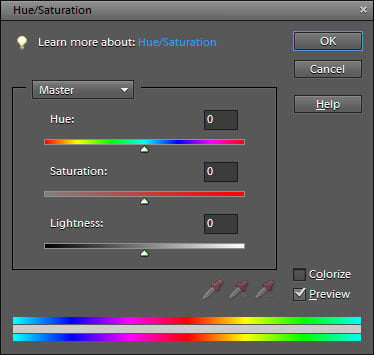
hue is the colours, changing depending on the placement of the slider.
saturation, when moved to the left mutes colours, and then moved right, causes them to be more saturated and full of colour

lightness changes how light or dark colours are by adding white/ black filters
using the hand icon at the bottom of the menu will allow you to choose a specific colour from the image to edit and adjust.
naming layers are important because they will allow you to keep track of which layers are which, with larger projects, you will have more layers so it will become hard to keep track of each one.
the options bar will be across the top of the screen and depending on what you have chosen to put in it via the “window” tab, it will display different things such as types of brush, the thickness, and opacity of your edits.
the types of marquee tool available are rectangular, elliptical and single row/column

when a selection is active, the outline of the area will have lines travelling around it

to create a new normal layer click the piece of paper with the turned corner.

layers are important because they allow you to edit specific parts of the image without damaging the rest. they will also allow you to put things in front of other things like outlines.
using just one layer will be more difficult and maybe even impossible to achieve the desired effect, in order to create a professional looking edit you will need to have layers to ensure that your work has the desired effect. Using just one layer will be a problem if a mistake is made, as you will have to delete sections of the entire work rather than different sections reserved for each piece in layers.
the shortcut for the quick selection tool is just the W key. The other tool in the quick selection tools submenu is the magic wand tool.
to select the brush tool you can simply click on it or you can press B.

pressing “B” to access the brush tool is called a shortcut, there are shortcuts for most tools. they can make digital work easier because you won’t have to use the mouse and remember where the specific button is for the tool, and many tools shortcuts are obvious and easy to learn such as B for brush tool.
There are many different settings for the brush tool, you can customize the size, smoothness, opacity and colour. There are also different styles of brush that have different effects, almost like fonts, but for paint.

They allow you to make different shapes and lines, you can choose how spaced the shapes are so you can have a close together line of shapes or just a few, spaced apart.
For me, softer brushes were nicer to use as mistakes were easy to fix and can make images appear softer. If you want an image to have bright, vibrant colours you should use a harder brush like the first in the image above.
Photoshop may be used by companies to create their logos, it is also used by photographers for editing pictures and graphic designers.
when you name a document if photoshop you should make it recognizable and short. this is to keep your files professional and neat and also so you don’t lose anything.
The colour system I use is CMYK because it is better for printing images.
The Dodge tool and Burn tool are used to lighten or darken areas of an image.
changing the midtones, low tones and high tones of an image can change the overall effect an image has on a viewer, making the mood different depending on the image. A darker image may contrast a happy scene occurring in the image, the tone must match the image.
